
Brake and Battery Light On: Possible Reasons and Solutions
Brake lights are part of the many warning lights on the vehicles’ dashboard that notifies drivers of developing problems. The battery light, on the other hand, indicates an issue with the battery. Sometimes, two unrelated lights can illuminate simultaneously on the vehicle’s dashboard, creating confusion.
So, why are the brake and battery lights on? Some of the reasons these two warning lights are on include electrical connection issues, like a short circuit or a loose connection, brake system issues, and low brake fluid. Battery charging issues, like due to a faulty alternator or voltage regulator, are also possible causes.
The article discusses various reasons why these two lights come on simultaneously and their solutions. Keep reading.
Brake Light and Battery Light on Causes and Solutions Overview
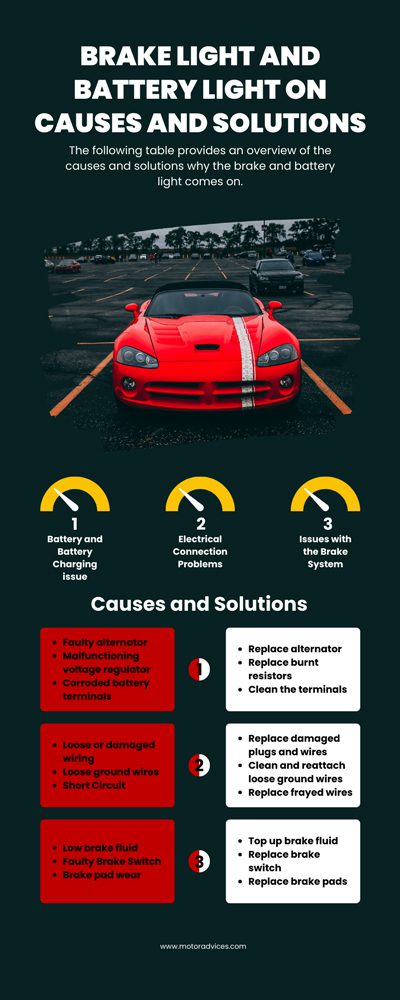
The following table provides an overview of the causes and solutions why the brake and battery light comes on.
| Causes | Solutions | |
| Battery and Battery Charging issue | Faulty alternator Malfunctioning voltage regulator Corroded battery terminals | Replace alternator Replace burnt resistors Clean the terminals |
| Electrical Connection Problems | Loose or damaged wiring Loose ground wires Short Circuit | Replace damaged plugs and wires Clean and reattach loose ground wires Replace frayed wires |
| Issues with the Brake System | Low brake fluid Faulty Brake Switch Brake pad wear | Top up brake fluid Replace brake switch Replace brake pads |
Below is a detailed discussion of the issues;
1. Battery and Battery Charging Problems
The two warning lights can come on together due to battery-related problems. Battery issues affect the vehicle’s electrical system, which can cause issues with the braking system, triggering the light. This scenario is more common where a vehicle is equipped with an electric braking system.

Some of the battery charging problems behind the two warning lights include;
A) Faulty Alternator
The alternator charges the vehicle’s battery when the engine runs and provides other components with power. The alternator gets damaged due to corrosion, short, loose wiring, or a bad battery. When the alternator is damaged, it doesn’t give the battery and various car components power.
The solution to a bad alternator is to replace it. Usually, repairs related to a vehicle’s electrical system should be handled by a professional. However, if you have a basic understanding of the vehicle repairs, you can change it by following the steps below;
- Step 1. Disconnect the vehicle’s battery
- Step 2. Locate the alternator. Refer to your user manual if you can’t locate it
- Step 3. Remove bolts and the serpentine belt
- Step 4. Remove the old alternator
- Step 5. Install the new one
B) Malfunctioning Voltage Regulator
The voltage regulator manages the amount of power from the alternator, preventing overload to the car’s components. Overheated electrical components and damaged ground wires are some of the reasons behind a malfunctioning voltage regulator.
Some of the solutions to a malfunctioning voltage regulator include;
- Ensure all connections towards and from the voltage regulator are well secured.
- Replace burnt resistors and capacitors. The steps include;
- Step 1. Turn off the engine and locate the burnt resistors and capacitors, they’re usually on the circuit board.
- Step 2. Disconnect the wiring to the resistor or capacitors and in some cars use the disordering tool.
- Step 3. Clean the board and solder the new parts back on.
- Step 4. Test to see if the lights are off.
- Ensure the power to the voltage regulator is within the required range.
- Ensure the voltage regulator can disperse heat ideally to avoid overheating.

C) Corroded Battery terminals
Corroded battery terminals interfere with the current flow to and from the battery. The battery corrodes due to exposure to humidity, especially during warm seasons. Corrosion means the battery doesn’t charge enough and produces low power when needed.
The solution to corroded battery terminals is to clean them. Follow the steps below;
- Step 1. Disconnect the battery cables
- Step 2. Apply cleaner or a baking soda and water solution
- Step 3. Use a brush to scrub the terminals
- Step 4. Connect the batteries back on
- Step 5. Test the vehicle
2. Electrical Connection Problems
Various electrical connection problems affect the effectiveness of battery charging and braking systems and interfere with their operations. These issues can cause the brake and battery light to come on.

A) Loose or damaged wiring
Loose or damaged wiring in various parts of the car’s electrical system, like the alternator, battery, and brake system, can trigger the lights. The wiring can become frayed or damaged with time as the vehicle ages.
The solutions to the loose wiring causing the brake and battery light to come on include;
- Check for frayed or damaged wiring to these electrical systems and fix them. Frayed wires can be fixed using electrical tape or heat-shrinking tubing.
- Replace the more damaged wires with new ones.
- Ensure the connection points are properly secured.
- Replace broken plugs. The steps include:
- Step 1. Turn off the vehicle and set it to park brake
- Step 2. Identify the faulty wiring plugs
- Step 3. Disconnect the plug
- Step 4. Add new plugs and reconnect the wiring
- Step 5. Check whether the warning lights go off
B) Damaged or Loose ground wires
The ground wires complete the circuit in a car’s electric system, allowing them to work seamlessly. As the vehicle ages, the ground wires can become loose or damaged, interfering with electricity flow and triggering various warning lights, including the brake and battery lights.
The following are some solutions to damaged or loose ground wires causing the two warning lights to illuminate.
- Check the ground wire connection from the battery to the chassis and ensure it connects on a clean surface. Use a cleanser or scrub the surface with sandpaper to remove rust on the connections.
- Tighten the ground connection points to ensure they are tight.
- Check for damaged ground wires and replace them.

C) Short Circuit
A short circuit happens when the electrical current gets on a line. It’s not supposed to be in a system. The short happens in the car’s electrical system from various parts, including connectors and wiring harnesses.
The short causes damage to wires and blows fuses, triggering various warning lights, including these two. The solutions to this problem include;
- Check and fix any loose harnesses in the electrical system.
- Repair damaged wiring and avoid further damage through a short circuit.
- Replace the faulty connectors. The steps include;
- Step 1. Disconnect the battery.
- Step 2. Identify the faulty connector to the brake light and disconnect it.
- Step 3. Follow the steps in the user manual for specific steps for preparing and installing the new connectors. They vary with vehicle models.
- Step 4. Reconnect the battery.
- Step 5. Check if the lights go off.
Insulate damaged or frayed wiring. The steps include;
- Step 1. Disconnect the car battery.
- Step 2. Access the frayed wiring.
- Step 3. Use an electric tape to insulate the wiring.
- Step 4. Confirm whether the short is gone and the two warning lights go off.
3. Issues With the Brake System
As mentioned earlier, issues with the braking system can cause the two warning lights to illuminate. The brake light comes on to notify the driver of a problem with the braking system. The battery light can come on as a secondary light.
These issues include;
A) Low Brake Fluid
Low brake fluid usually causes the brake light to come on, followed by a battery light as a secondary warning light. Brake fluid gets low due to a leak in the system and damaged brake pads.
The solutions include
- Check for leaks in the system and provide a fix.
- Top up the brake fluid to ideal levels. Usually, this is between the min and max lines.
B) Faulty Brake Switches
The brake switch activates when the driver depresses the brake pedal. With time, the brake switches malfunction and get stuck in a closed position, triggering the brake light. In this case, the battery, which powers the brake switches, can come on to indicate an electric system problem.
The solutions for malfunctioning brake switches include;
- Locate the brake switch and test it through a sensor to tell if it is still functional or needs replacement. Usually, it’s near the brake pedals
- Replace the brake switch if necessary. Below are the steps to follow for replacement;
- Step 1. Disconnect the vehicle’s battery
- Step 2. Locate the brake switch, usually near the brake pedals
- Step 3. Unscrew or unclip the brake switch. Disconnect the wiring too.
- Step 4. Screw or clip back the brake switch and reconnect the wiring.

C) Brake pad wear
The brake pad wear sensor monitors the level of wear on the brake pads. When the pads are worn to a certain level, it sends signals to the system, activating the brake light on the dash.
If the sensor malfunctions, the battery light can also activate to signify an issue with the vehicle’s electrical system. The solutions include;
- Confirm brake pad wear
- If the pads are worn out, replace them and the light should turn off.
Follow the following steps;
- Step 1. Lift the vehicle on the wheel with worn brake pads
- Step 2. Remove the wheel
- Step 3. Remove the brake calipers
- Step 4. Remove the worn brake pads
- Step 5. Install replacement brake pads
- Step 6. Reinstall the calipers
- Step 7. Breed the brakes
If the brake pads are not worn out, the sensor is faulty. Replace the brake pad wear sensor in the following simple steps;
- Step 1. Locate the brake pad sensor usually on brake pads or calipers
- Step 2. Lift the vehicle and remove the wheel
- Step 3. Remove the calipers to access the brake pads and the sensor
- Step 4. Remove the faulty sensor then replace it with a new one.
- Step 5. Reinstall the calipers and then the wheel.
- Step 6. Check if the light goes off
Related Questions
Some questions most people ask about the brake and battery light on include the following;
Yes. A dead battery can cause the brake light to come on on the dashboard. Like most other warning lights, the brake light can illuminate to show the voltage drop. Replace the battery to see whether the brake light will go off, and if not, diagnose the brake system more.
Since the alternator is among the common reasons behind the two warning lights coming on, fixing it can turn them off. However, the lights may be on due to other electrical or braking system issues, and replacing the alternator won’t fix it. Diagnose the problem further to determine the problem.
The vehicle’s brake switch draws power from the battery to do its actions when the vehicle brake pedal is depressed. Also, the battery powers the brake lights, allowing them to illuminate when necessary. That’s why the two warning lights can come on simultaneously if an issue develops.
Bottom Line
Brake and battery light on in your vehicle for various battery-related problems, like a faulty alternator or voltage regulator. The interruption in the electrical current causes problems with the vehicle’s braking system. However, electrical issues like a short circuit can also be responsible.
Resolving the issues behind the lights usually turns the light off. The article discusses the problems and their solutions to help you solve them. You can also hire a professional to diagnose and fix these problems for you.
