
Brake Light Won’t Turn On: What to Look for First?
It’s standard for each vehicle to have all the brake lights in perfect working condition. These lights help drivers behind the car know when it is braking and brake on time. But when brake lights don’t turn on as expected, the reason must be identified soon.
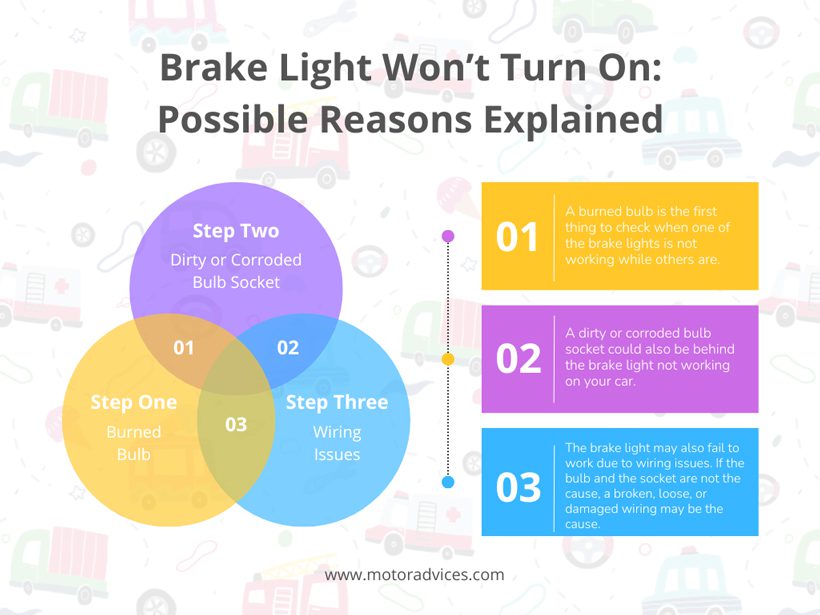
So, what are the reasons the brake light won’t turn on? A burnt bulb or a corroded bulb socket are the usual reasons the brake lights don’t turn on. A wiring issue may also be responsible for the light not working. The problem requires further diagnostics to determine the actual cause and provide solutions.
This article aims to help you identify the issue behind your brake light not working and provide a solution. Read on.
Brake Light Won’t Turn On: Possible Reasons Explained
Brake lights in the car work together, illuminating when you press the brake pedal. They notify the driver behind you that you’re slowing down, allowing them time to brake.
Despite working simultaneously, on some occasions, one of the lights may stop working. While other lights still work and alert the drivers riding behind when you brake, the failing light should be fixed immediately.
The following are the possible reasons why one of the brake lights is not working, while others do.
1. Burned Bulb
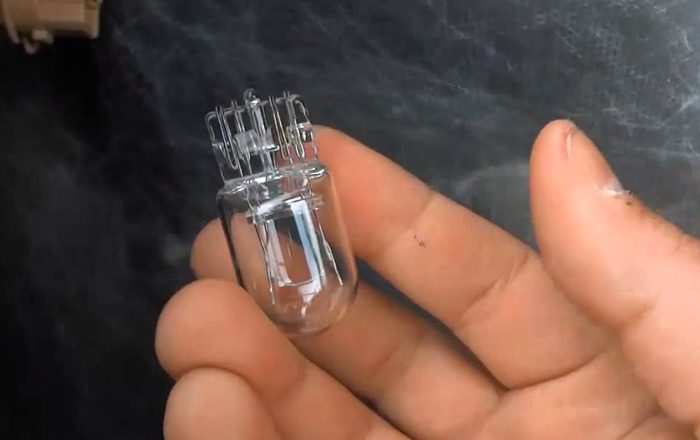
A burned bulb is the first thing to check when one of the brake lights is not working while others are. Most vehicles feature a bulb as the brake light, which has a shorter lifespan of about one year than modern LED brake lights. The constant lighting and turning off while the vehicle brakes burn the bulb’s filaments.
Besides, a short in the wiring to the affected brake light can also cause the bulb to burn. A short circuit can cause a voltage spike in the braking system, which causes the filament to burn.
Diagnosis
Diagnose the bulb to confirm if it’s burned and causing the brake light not to come on. This diagnosis involves removing it from the vehicle and inspecting it.
Follow the steps below to access the bulb;
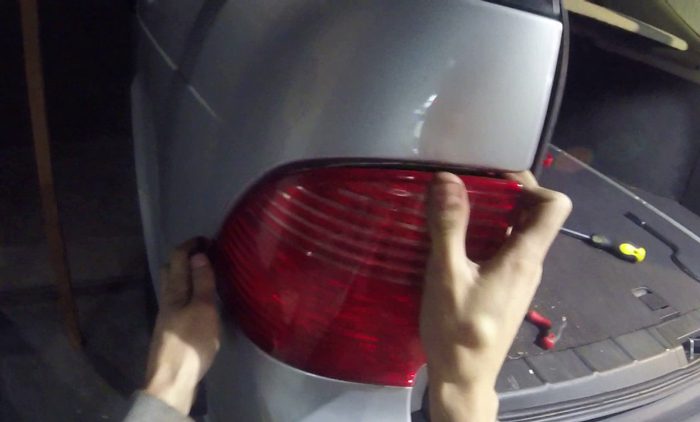
- Step 1. Turn off the vehicle
- Step 2. Depending on the vehicle type, you may need to unscrew the bolts holding the taillight’s assembly. However, in some cars, especially sedans, pulling aside the trunk’s fabric will give you access to the brake light assembly and the bulb.
- Step 3. Pick a compatible socket and ratchet, then unscrew the assembly.
- Step 4. Twist the bulb’s socket counterclockwise to loosen it.
- Step 5. Pull out the bulb from the socket.
Check the bulb for burnt filaments, which will confirm that it’s burned out. Also, inspect for physical damage to the bulb.
If your bulb looks fine, swap it with the working bulb on the other side of the car. Test the light by pressing the brake pedal, which will confirm if it has issues.

Solutions
The only solution to a burnt bulb is to replace it with a new one. Confirm on the user manual the kind of bulbs used on your vehicle. Afterwards, visit a nearby auto shop and buy them.
Once you have the bulb, follow the steps below to replace it;
- Step 1. Access the taillight assembly by unscrewing or pulling the fabric in the vehicle trunk.
- Step 2. Turn the bub’s socket on the assembly anticlockwise to get it loose.
- Step 3. Remove the bulb by pulling it out of the socket. Some bulb types need pressing and then turning anticlockwise to remove.
- Step 4. Apply some bulb grease to the new bulb’s base area and put it back on. Ensure it’s well seated before replacing the socket back on the assembly, then lock it by turning it clockwise.
- Step 5. Screw the assembly back on.
The following videos show how to replace the taillight bulbs.
It’s best to change both taillights when changing one to ensure they work for a long time together. A professional will charge you between $35 and $90 to replace the bulbs.
2. Dirty or Corroded Bulb Socket
A dirty or corroded bulb socket could also be behind the brake light not working on your car.
The socket can get dirty, especially if the assembly is loose or broken. The dirt can interfere with the electrical connection between the socket and the bulb, causing the light not to work.
Besides dirt, the socket could also be corroded, which disrupts the electrical transfer. It’s about moisture in the taillight assembly, which happens for loose sockets or brake light assembly.

Diagnosis
To check whether dirt and corrosion are behind the issue, access the socket and visually inspect it. Follow the steps below;
- Step 1. Unscrew the taillight assembly. In most sedans, pop the trunk, unscrew the cover, then unscrew the assembly. Consult your user manual if unsure how to go about it.
- Step 2. Once you access the assembly, twist the socket to the brake light anticlockwise to open it.
- Step 3. Remove the bulb by pulling or twisting it anticlockwise.
- Step 4. Inspect the socket for dirt and corrosion.
Solution
If you have a dirty socket, clean it using an electrical contact cleaner, like acetone or rubbing alcohol. A corroded socket can also be fixed using mild acid, like oxalic acid, baking soda, and vinegar.
Access the socket by following these steps
- Step 1. Turn off the vehicle and disconnect the battery.
- Step 2. Remove the brake light assembly by unscrewing it.
- Step 3. Turn the socket anticlockwise to remove it from its position.
- Step 4. Remove the bulb.
- Step 5. Add the mild acid solution of your choice to a basin.
- Step 6. Dip the socket in the solution for about 15 minutes.
- Step 7. Use Emery paper or a brush to scrap the contacts.
- Step 8. Allow the solution to dry then test the brake light.
- Step 9. Install the bulb and place the socket back on the assembly.
- Step 10. Screw the brake light assembly back on the vehicle.
The following video shows how to clean a corroded taillight socket using vinegar.
It’s also best to check and clean other bulb sockets, as they may be corroded. A professional will charge you between $30 and $100 to check and clean your brake light socket.
3. Wiring Issues
The brake light may also fail to work due to wiring issues. If the bulb and the socket are not the cause, a broken, loose, or damaged wiring may be the cause.
The wiring can get damaged due to wear and tear caused by the constant vehicle’s movement. Also, the electrical insulation around the wires can deteriorate over time after exposure to heat.
Besides, rodents can access the car, chew on the wires, and damage them.
Diagnosis
To test wiring, check for continuity and voltage using a multimeter. To do this, follow the steps below;
- Step 1. Access the brake light’s bulb socket by unscrewing the bolts to the assembly.
- Step 2. Set the multimeter to DC voltage and touch one of the contact pins
- Step 3. Someone presses the brake pedal, and if there is no voltage, there are wiring issues
- Step 4. Also, wiggle the socket while checking to identify a loose connection.
Solutions
If it’s a wiring issue, trace the wire with the problem. Usually, black is the ground and holds the vehicle’s chassis. The brown, red, or blue wire is the positive. Consult the user manual to learn your car’s brake light coloring and routing.
Usually, the loose, broken, or damaged wires are near the brake light’s socket. If this is the case, provide the following solutions;
- Reconnect any loose wire.
- Reattach broken wires using the heat shrink wraps.
- Repair damaged wires by wrapping electrical tape on the frayed parts.
- Reattach the ground connection.
Fixing a wiring issue will cost between $15 and $40 to diagnose and fix. However, a professional will cost you more than $60.

Related Searches
The following section answers some questions you might ask yourself about one brake light not turning on. They include;
Usually, one hour is enough to diagnose and fix the issue behind one brake light not turning on the problem.
Most repair shops average between $70 and $150 to diagnose and fix the issue behind one brake light not working. However, the price may be more or less depending on the problem.
Likely, you have already driven the vehicle for some time before realizing that the brake light is off on one side. While it is possible, it is usually better to get the light repaired when you notice it.
Final Words
The brake light may not be working on your car for the reasons discussed in the article. They include a burnt bulb, wiring issues, and a dirty or corroded bulb socket. In rare occasions a brown fuse or a faulty brake light switch may be a reason.
Perform further diagnostics to determine the exact issue behind the light not working. The steps in the article should also guide you when diagnosing and repairing the issue. However, hire a professional if you’re uncomfortable doing it or don’t want to risk creating another problem.
